March 9, 2026
Healthy Kit-Kat Bars
There are a few classic candy bars that instantly bring back childhood memories, and Kit-Kats are definitely one of them. The crispy layers, the chocolate coating, that perfect snap when you break them apart — iconic.
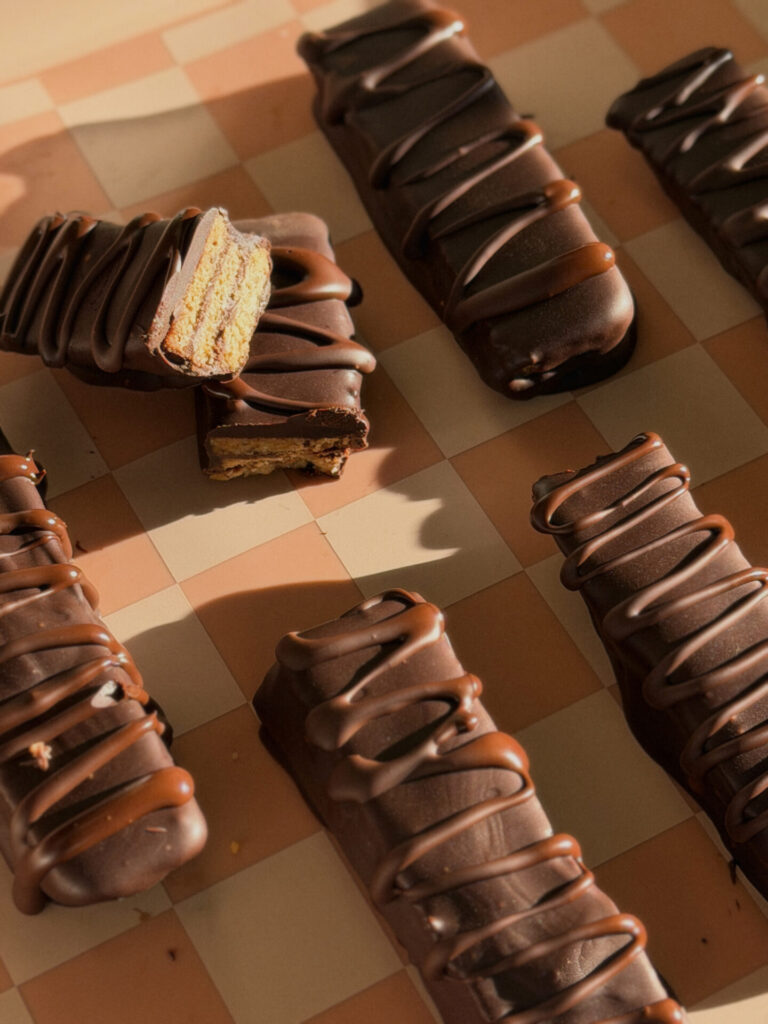
But if you’ve looked at the ingredient list on the original… it’s not exactly something I want to keep stocked in the pantry.
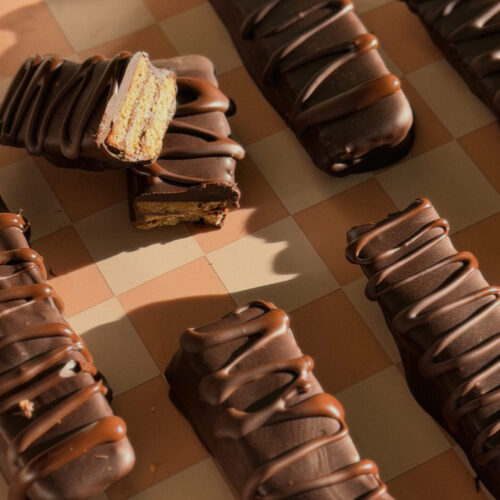
These Healthy Homemade Kit-Kat Bars have crispy almond flour wafers, a creamy chocolate peanut butter fudge center, and a rich dark chocolate coating. They’re made with simple ingredients, naturally sweetened, and still give you that layered crunch that makes a Kit-Kat so good.
They’re nostalgic, chocolatey, and honestly shockingly easy to make.
Why You’ll Love These
-
Made with simple pantry ingredients
-
Gluten-free almond flour wafers
-
Naturally sweetened with coconut sugar
-
Rich dark chocolate coating
-
Still gives that crispy layered Kit-Kat vibe
They’re the kind of treat that feels fun and nostalgic but made with ingredients you actually recognize.
Healthy Homemade Kit-Kat Bars
Yield: about 8–10 bars depending on size
Ingredients
Wafer Layers
-
1¼ cup almond flour
-
3 tbsp coconut sugar
-
1 tbsp ground flaxseed
-
Pinch sea salt
-
3 tbsp melted coconut oil
-
1 tbsp water
-
1 tsp vanilla
Fudge Center
-
3 tbsp creamy peanut butter (or nut butter of choice)
-
2 tbsp dark chocolate
Chocolate Coating
-
1 cup dark chocolate chips (I love Hu baking chips)
-
1 tbsp coconut oil
Optional: flaky sea salt for topping
Instructions
1. Make the Wafer Dough
Preheat your oven to 350°F.
In a bowl, mix together:
-
almond flour
-
flaxseed
-
coconut sugar
-
sea salt
In a separate small bowl whisk together melted coconut oil, water, and vanilla, then pour into the dry ingredients and mix until a dough forms.
2. Roll & Cut
Place the dough onto a piece of parchment paper and cover with a second sheet of parchment.
Roll the dough out to about ⅛-inch thickness.
Use a pizza cutter or knife to cut small rectangles. Reroll the scraps and repeat until all the dough is used.
Transfer the parchment with the dough onto a baking sheet.
3. Bake the Crispy Wafers
Bake for 9–10 minutes, until lightly golden and crispy.
Before they fully cool, use a pizza cutter to gently separate the cookies so they don’t stick together.
Let them cool on a wire rack.
4. Make the Fudge Filling
In a small bowl, melt together the peanut butter and dark chocolate in 20-second intervals, stirring between each until smooth.
5. Assemble the Layers
Spread a thin layer of fudge on two out of every three cookies, then stack them.
A traditional Kit-Kat has 3 cookie layers and 2 fudge layers, but you can also make smaller ones with 2 cookie layers.
Place the stacked cookies in the freezer for about 15 minutes so the fudge sets.
6. Coat in Chocolate
Melt the chocolate chips and coconut oil together in 30-second intervals, stirring until smooth.
Using a fork, dip each cookie stack into the melted chocolate and place on parchment paper.
Return to the freezer to let the chocolate set.
7. Optional (but recommended)
Drizzle with extra melted chocolate and sprinkle with flaky sea salt.
Because chocolate + sea salt = always the right decision.
Storage
Store in the fridge or freezer in an airtight container.
They’ll keep for:
-
1 week in the fridge
-
1–2 months in the freezer
Honestly though… they rarely last that long.
A Little Nostalgic Moment
These are one of those recipes that feel fun and a little nostalgic, but made with ingredients you feel good about.
They still have that crispy layered texture and chocolate snap, just with almond flour wafers and real chocolate.
Which means you can break off a piece with your kids and enjoy the moment… without the mystery ingredients.
If you make them, tag me @whatrobineats so I can see your homemade Kit-Kat creations!!
Healthy Kit-Kat Bars
Ingredients
- 1 1/4 cup almond flour
- 3 tbsp coconut sugar
- 1 tbsp ground flaxseed
- pinch of sea salt
- 3 tbsp melted coconut oil
- 1 tbsp water
- 1 tsp vanilla extract
Fudge center
- 3 tbsp creamy peanut butter or other nut butter of choice
- 2 tbsp dark chocolate
Chocolate coating
- 1 cup dark chocolate chips
- 1 tbsp coconut oil
Instructions
- Preheat your oven to 350°F.In a bowl, mix together:almond flourflaxseedcoconut sugarsea saltIn a separate small bowl whisk together melted coconut oil, water, and vanilla, then pour into the dry ingredients and mix until a dough forms.
- Place the dough onto a piece of parchment paper and cover with a second sheet of parchment.Roll the dough out to about ⅛-inch thickness.Use a pizza cutter or knife to cut small rectangles. Reroll the scraps and repeat until all the dough is used.Transfer the parchment with the dough onto a baking sheet.
- Bake for 9–10 minutes, until lightly golden and crispy.Before they fully cool, use a pizza cutter to gently separate the cookies so they don’t stick together.Let them cool on a wire rack.
- In a small bowl, melt together the peanut butter and dark chocolate in 20-second intervals, stirring between each until smooth.
- Spread a thin layer of fudge on two out of every three cookies, then stack them.A traditional Kit-Kat has 3 cookie layers and 2 fudge layers, but you can also make smaller ones with 2 cookie layers.Place the stacked cookies in the freezer for about 15 minutes so the fudge sets.
- smooth.Using a fork, dip each cookie stack into the melted chocolate and place on parchment paper.Return to the freezer to let the chocolate set. Drizzle with extra melted chocolate and sprinkle with flaky sea salt.
- Store in the fridge or freezer in an airtight container.They’ll keep for:1 week in the fridge1–2 months in the freezerHonestly though… they rarely last that long.